
Push Notification UI Testing

If you’ve ever tried to test push notifications manually, you know they can be a pain. First you have to load your app onto a device (not the simulator), go through your app flow, make sure you have the app closed/open, etc. Wouldn’t it be nice to be able to automate this kind of testing?
With the changes to XCUITest in Xcode 9, it is now possible. We now have a way to interact with the springboard and any notifications that might come down.
One issue you might encounter might be — “How do I send a push notification from a test?”. Luckily for us, there is a handy third party library called NWPusher (https://github.com/noodlewerk/NWPusher) that we can use to send out push notifications automatically.
But hold on — there’s still one more issue we need to solve before we can fully automate this. If you’re not already aware, every time we send a push notification, we must have the iOS device’s current device ID. This can change when you uninstall and re-install the app, and it is of course different between devices.
You could just hard-code the device ID of your test device, but that would kind of defeat the purpose of automating these tests, wouldn’t it?
However, it turns out your app is already communicating the device ID already — your app should have a place where it is sending the device ID to your server, right?
Turns out we can use this fact to our advantage. We can use a Swift micro-server HTTP library to run a mock server in our test runner app, and point the app’s URL at our mock server.
The following a step-by-step of how you can set up an extremely simple app using the above methodology. If you want to just look at the code, you can check it out here: https://github.com/mds6058/PushNotificationUITesting .
First Step: Configuring your UI Test Target
The first step is setup your UI test environment so it will work against a real device. Note that you cannot test real push notifications against a simulator. While it might be possible to hack something up that might send local notifications, we want to test real ones here.
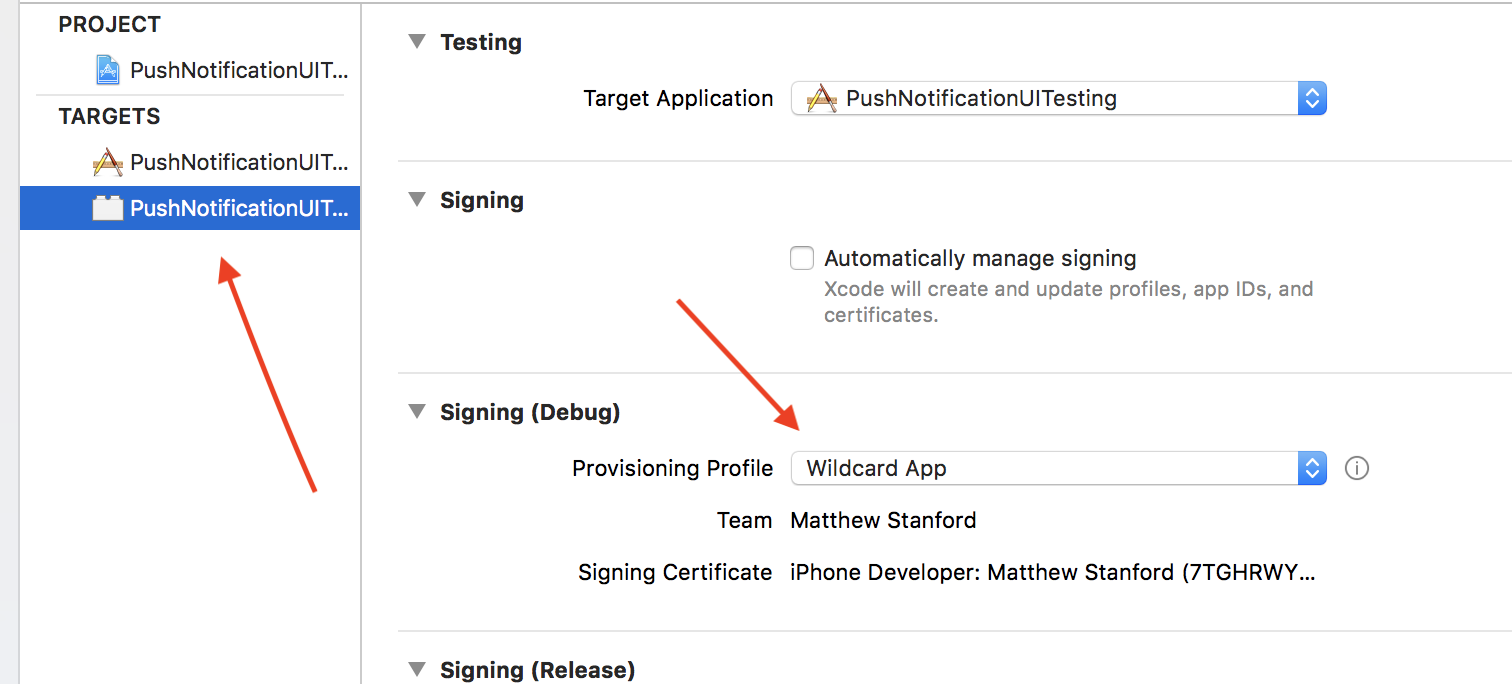
Go through these steps to make sure your UI Test environment is setup correctly:
- Ensure your UI Test target is using a provisioning profile which includes ones of your iOS test devices
-
Make sure your app is set up for push notifications in general (entitlement enabled, push cert generated from developer portal)
-
Ensure your app is configured to point at localhost:8080 as its domain while running UI tests
-
Your app’s info.plist must have a key set in the App Transport Security Settings for NSAllowsLocalNetworking. Without this set, your app won’t be able to connect to the localhost domain.
The Mock Server
There are a couple Swift server libraries out there. There are a few out there meant for production-ready web servers (frameworks like Perfect, Vapor, etc.), but what we want something lightweight. I have been using Swifter (https://github.com/httpswift/swifter), but you could also try using Embassy (https://github.com/envoy/Embassy) as well. The examples in this post use Swifter.
In my UI test target, I added the following class for my mock server:
import Foundation
import Swifter
import NWPusher

typealias JSON = [String: Any]

class MockServer {

    var server = HttpServer()
    var pushToken: String?

    /*
        Start up the server and configure handling of the device token endpoint
    */
    func setUp() {
        do {
            try server.start(8080)
            setupPushTokenEndpoint()
        } catch {
            print("Error starting mock server" + error.localizedDescription)
        }
    }

    /*
        Remember to call this to shut down your server when the test ends
    */
    func tearDown() {
        server.stop()
    }

    /*
        This configures the mock server to handle the push notification endpoint
     */
    private func setupPushTokenEndpoint() {

        let response: ((HttpRequest) -> HttpResponse) = { [weak self] request in

            guard let serializedObject = try? JSONSerialization.jsonObject(with: Data(request.body), options: []),
                let json = serializedObject as? JSON,
                let token = json["deviceToken"] as? String else {
                return HttpResponse.badRequest(nil)
            }

            //Save off of the push token once we parse it
            self?.pushToken = token

            print("got push token: \(token)")

            return HttpResponse.ok(HttpResponseBody.text(""))
        }

        server.POST["/pushEndpoint"] = response
    }
}
It’s pretty simple if you break it down into pieces. It’s just 3 methods: 1) Startup method 2) Cleanup Method, and 3) A method to setup the device token endpoint (which in this example is /pushEndpoint)
Now let’s make sure we send the device token to our mock server
Setting Up the App
In your code, you almost certainly have a function that is sending off the device token to a remote server. What you must do is ensure that you set the host of this URL request to localhost:8080 when running the UI test.
In practice, what you should do is either 1) Send in a flag through the launch options when running a UI test or 2) set a compiler flag indicating you are running a UI test to switch to. For the sake of brevity here, I’m just hard coding localhost:8080 for the request to /pushEndpoint in my AppDelegate class below:
func application(_ application: UIApplication, didRegisterForRemoteNotificationsWithDeviceToken deviceToken: Data) {
    let token = deviceToken.map { String(format: "%02.2hhx", $0) }.joined()
    sendPushTokenToServer(token: token)
}

private func sendPushTokenToServer(token: String) {
    let endpoint = "http://localhost:8080/pushEndpoint"

    guard let endpointUrl = URL(string: endpoint) else {
        return
    }

    //Make JSON to send to send to server
    var json = [String:Any]()
    json[UITestingConstants.pushTokenKey] = token

    guard let data = try? JSONSerialization.data(withJSONObject: json, options: []) else {
        return
    }

    var request = URLRequest(url: endpointUrl)
    request.httpMethod = "POST"
    request.httpBody = data

    let task = URLSession.shared.dataTask(with: request)
    task.resume()

    print("sent token: \(token)")
}
The last step in our setup is setting up a method to send push notifications from our test runner.
Sending Push Notifications from the Test Runner
The following is the code I use for sending a push from the UI test runner (put this code in your UI test target):
func triggerPushNotification(withPayload payload: String) {

    /*
      Load our certificate we generated on the Apple Dev server into memory
    */
    let uiTestBundle = Bundle(for: PushUITests.self)
    guard let url = uiTestBundle.url(forResource: "pushtesting_sandbox", withExtension: "p12") else {
        XCTFail("Couldn't get push key!")
        return
    }

    /*
      Ensure we have the current device's device token
    */
    guard let deviceToken = mockServer.pushToken else {
        XCTFail("Couldn't find device token!")
        return
    }

    /*
      Send the push with the NWPusher library
    */
    do {
        let data = try Data(contentsOf: url)
        let pusher = try NWPusher.connect(withPKCS12Data: data, password: "password", environment: .sandbox)
        try pusher.pushPayload(payload, token: deviceToken, identifier: UInt(arc4random_uniform(UInt32(999))))
    } catch {
        XCTFail("Error connecting to push server.  Check to see if the push certificate is expired or the password is correct!")
        print(error)
    }
}
As you can see above, the first thing we do is load in the certificate you generated for push notifications into memory (make sure it is the sandbox version!). You should add this file to the project and make sure it is part of the UI test target.
After that, all that’s left to do is send your push notification with the NWPusher library. Do ensure your notification is in the proper format. A sample push notification payload might look something like this:
{"aps":{"alert": "Test Message", "badge":1}}
Of course a notification can get a lot more complicated than that, but that’s just a sample.
Running a Test
Now finally we can run a test! Here’s a sample test:
var mockServer = MockServer()
var app = XCUIApplication()

override func setUp() {
    super.setUp()
    mockServer.setUp()
}

override func tearDown() {
    super.tearDown()
    mockServer.tearDown()
  }

func testPushNotification() {
    app.launch()
    //Wait for our initial view controller to load by making sure its label shows up
    waitForElementToAppear(object: app.staticTexts["Push Notification UI Testing"])

    //Tap the home button
    XCUIDevice.shared.press(XCUIDevice.Button.home)

    //Trigger a push notification
    triggerPushNotification(withPayload: .pushType1)

    //Tap the notification when it appears
    let springboard = XCUIApplication(bundleIdentifier: "com.apple.springboard")
    let springBoardNotification = springboard.otherElements["NotificationShortLookView"]
    waitForElementToAppear(object: springBoardNotification)
    springBoardNotification.tap()

    waitForElementToAppear(object: app.staticTexts["Push Notification UI Testing"])
}

func waitForElementToAppear(object: Any) {
    let exists = NSPredicate(format: "exists == true")
    expectation(for: exists, evaluatedWith: object, handler: nil)
    waitForExpectations(timeout: 5, handler: nil)
}
You’ll notice in the test above we are utilizing both the mock server we created earlier and our triggerPushNotification(withPayload:) function. If all goes well, your test should launch the app, then put it in the background, then send a push notification to your device, and the UI test will tap on it!
And We’re Done!
Setting all that up is a bit of a chore, but I think it’s worth it. Testing push notifications is always a chore and I feel a lot of developers probably don’t do enough of it. With a testing framework like we went through here in place, you can have some more piece of mind when modifying your push notification logic in your app.
Once you get your first test up and running, don’t forget to test app states like being suspended vs. the app being completely closed and reacting to different app states/views. But I’ll leave that up as an exercise for the reader.
Again, feel free to check out the example project I set up here: https://github.com/mattstanford/PushNotificationUITesting. If you have any questions or want to discuss any further, feel free to talk to me on Twitter (https://twitter.com/MattStanford3).
Thanks for reading!